Project Editor
The Project Editor suite stores all information pertaining to the Hazid Integrity Projects. The imported data is stored within the project along with any Rules and Model configuration. All rule results and Process Safety results are stored and accessed from the Project Editor. For more Information see Project Editor"
The Project Editor stores all of the plant Data and configuration data for your Engineering Integrity or Safety Integrity Projects. It allows you to modify and edit all project attributes to successfully run safety, design or quality checks on your data.
The Project Editor allows you to conduct all configuration required to transfer your project into a Process model of your plant or to store any corporate configuration data from the Model Library.
The Project Editor is the main interface to the Engineering Integrity Module and the Safety Integrity Module. The access to the options for either of the modules you will be required to have an active licence for each. For users that do not have a licence for a specific module they will not see any of the options pertaining to that module.
For Engineering Integrity the Projects Editor allows you to create, edit run and manage all of your Integrity rules for your data . For Safety Integrity Module the Project Editor allows you to access all of your Safety Studies for Risk management.
Both modules navigate the Project Editor in the same way. For more Information see Navigating the Project Editor
Navigating the Project Editor
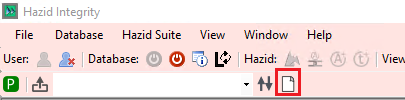
To access the Project Editor select the Project icon. This will enable the Project options on the toolbar.
 - Configure Alternate Connections - Opens the Alternate Connection Configuration Dialog. For more Information see Configure Alternate Connections
 - Open - Opens the selected Project
 - Project Selection - Selects the desired project
 - Refresh - Refreshes the Project with the database
 - Activate All Projects - Activates all the projects in the current project connection, up to the limit of the license.
 - Show or Hide Projects - Allows to user to show/hide projects via checkboxes, checked is show, unchecked is hide
 - New - Create a New Project. For more Information see Creating a New Project
 - Delete Project - Deletes the currently selected project
 - View Linked Model Library - View the linked model library in read only
 - View Linked Fluid Library - View the linked fluid library in read only
All other options available within the Project Editor are accessed through right clicking at the desired level of the project tree. For more Information see Navigating the Project Tree
Create New Project
All Hazid Integrity analysis must be created from a project. The project also stores links to the corporate Model Library and Fluid Library for use on the Project.
To Create a new Hazid Integrity Project select the "Create New Project" icon to open the Project creation form.
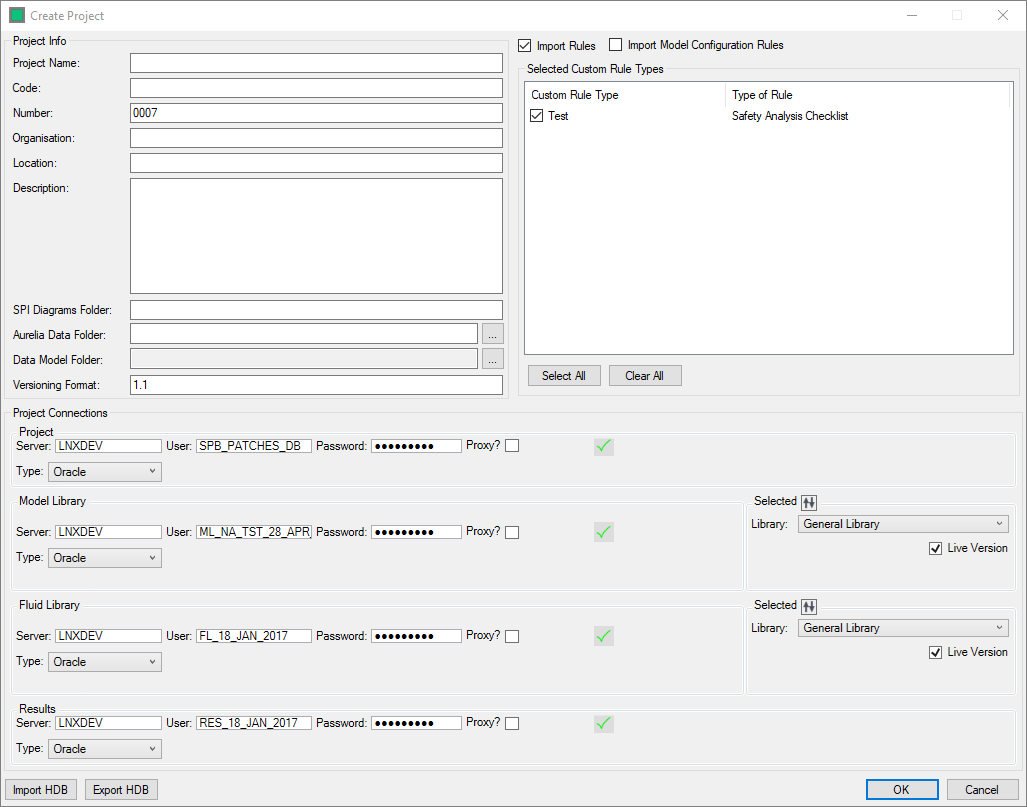
The mandatory fields required are
- Project Name - A name for which to refer to your project
- Project Code - The Code of your porject - up to 5 alphanumeric characters
- Project Number - A number to refer to your project. The number is auto generated from 0001 but you can overwrite this if necessary
- Model Connection - The Model Library that you will connect to the project
- Fluid Connection - The Fluid Library that you will connect to the project
Optional fields are
- Organisation - The Organisation name which the project pertains to
- Location - The office location of the main project team
- Description - A description of the project and the process it entails
Data location/update fields are
- SPI Diagrams Folder - The location to which SPI diagrams are exported - used to enable highlighting to SPI
- Aurelia Data Folder - The location in which the Aurelia Data (connections rules, piperun rules, label mapping, etc) are stored
- Data Model Folder - The location in which the Data model files (equations, units and workflow integrity data) are stored. The dialog for this is accessed through the
 button. Data Model Import
 - Versioning Format - The format of versioing of drawings within the Hazid system
Projects are required to have a full set of connections to allow the full features of the suite to be utilised
The databases in which the connections reside for the libraries must have been created previously via the Configuration Tool. To connect to a database enter its details and click on the ![]() to verfiy the connection.
to verfiy the connection.
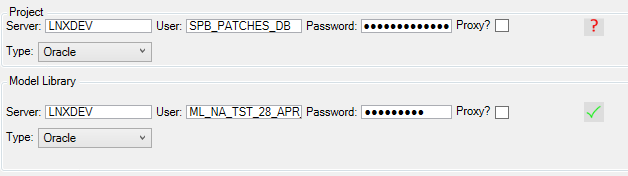
The "Proxy?" checkbox allows the user to specify a Target User for the proxy user to access.
The Library selection dialog operates in the same manner for both the Model and Fluid Libraries

The library to use can be selected from the "Library" dropdown, as can the version of the library to use (from the "Version" dropdown)
The "Live Version" checkbox is used to switch the project into using the current working version of the library.
An existing connection file can be imported via the ![]() button, and the defined connections exported via the
button, and the defined connections exported via the ![]() button
button
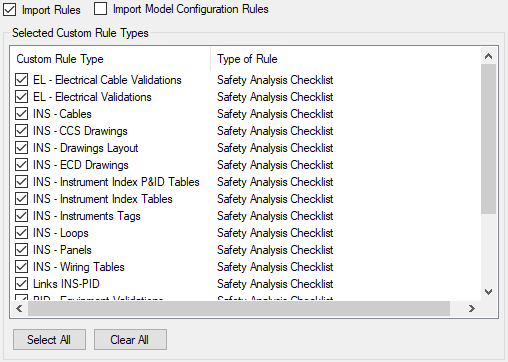
During the import process, both rules and model configuration rules can be selected to be transferred to the project in the import panel
Once the project is defined
![]() will save and close the form
will save and close the form
![]() will close and revert all changes
will close and revert all changes
Selecting ![]() will open an additional form
will open an additional form
Edit Project
All fields of the Project details can be edited, for Data Model folder definition see Data Model Location
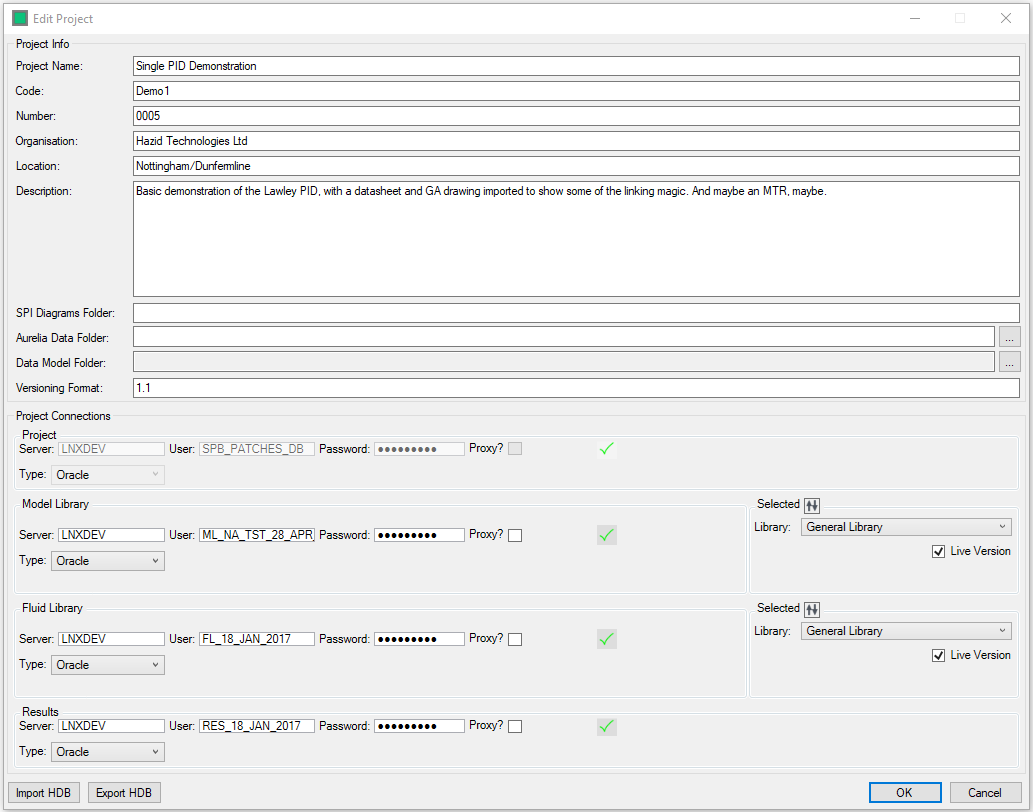
Projects are required to have a full set of connections to allow the full features of the suite to be utilised
The databases in which the connections reside for the libraries must have been created previously via the Configuration Tool. To connect to a database enter its details and click on the ![]() to verfiy the connection.
to verfiy the connection.
The "Proxy?" checkbox allows the user to specify a Target User for the proxy user to access.
The Library selection dialog operates in the same manner for both the Model and Fluid Libraries
The library to use can be selected from the "Library" dropdown, as can the version of the library to use (from the "Version" dropdown)
The "Live Version" checkbox is used to switch the project into using the current working version of the library.
An existing connection file can be imported via the ![]() button, and the defined connections exported via the
button, and the defined connections exported via the ![]() button
button
Be aware when changing linked libraries that there may be items using the model or other data from the original library. It is recommended to re-run Icon mapping and update fluid properties after changing either the Model or Fluid Library.
![]() will save and close the form
will save and close the form
![]() will close and revert all changes
will close and revert all changes