Import DWG
Import DWG
Before you can import a file into a project, it must first be uploaded to the User Documents. Once you have a file available for import, open Project Editor and select the root of the project tree. You will then be able to access the Conversion Menu:
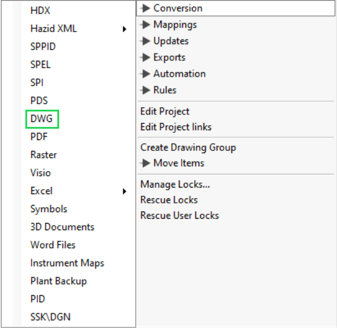
Select DWG from the list to open the Import window
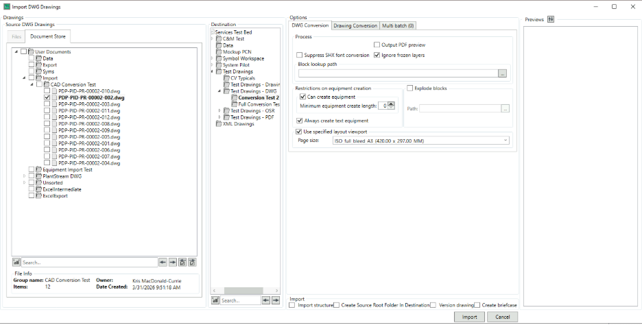
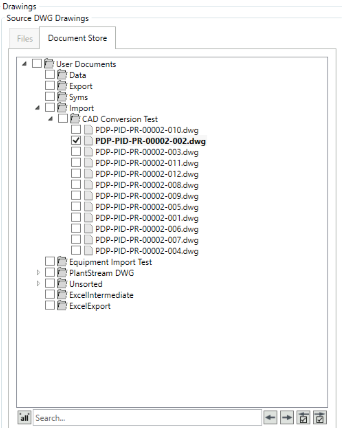
Select the file to import from the left column; in this instance we are importing a file uploaded to the “Document Store” on the web.
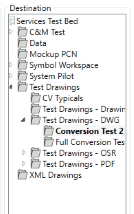
The centre column lets us choose were to import the file to in the project tree by selecting a document group from the tree:
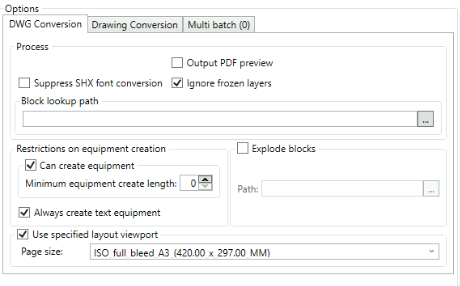
The right panel allows us to set import options, for a simple import we only need to enable the “Can Create Equipment” option and set the page size, in this instance Full Bleed
We can verify these settings before importing by clicking the preview button  which will give us a picture of the drawing to import and the document size.
With these options confirmed click  to start the automated process.
Import Options
Some drawings may require additional parsing at import to extract/manipulate the data in the source file, here we will describe the import options available.
DWG Conversion
On the DWG Conversion tab you can select:
- Suppress SHX font conversion – prevents SHX fonts from being recognised as text (not recommended in most cases)
- Ignore frozen layers – will not import any layers which are frozen on the source (if there are none, it can be left checked with no ill effects)
- Can create equipment - determines whether graphics will be created as equipment with data. This is necessary for most conversions, though for some purposes this can be disabled to improve performance.
- Minimum equipment create length - allows graphics below a certain length to be ignored as equipment. This is used mainly for importing lower quality source drawings, so should be left at 0 for DWG files.
- Always create text equipment: all text will be created as equipment regardless of the above settings. This is recommended as the text usually contains the most valuable data in the drawing.
- Use specified layout viewport – imports the drawing at a specified paper size (recommended when the original size of the source drawing is known)
Drawing Conversion
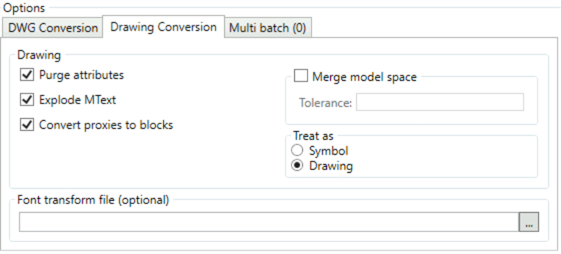
On the Drawing Conversion tab, the key options are:
- Purge Attributes – deletes superfluous data from the source, recommended in most cases as this data is not relevant to conversion
- Explode MText – splits multiline text objects into separate lines, this is generally preferable for extracting data.
- Convert proxies to blocks – converts proxy graphics in the source into block before importing, recommended as the proxies will not be imported otherwise
- Merge model space – used when there are inconsistencies between the Model Space and Paper Space of the source.
- Treat as Symbol/Drawing – select whether the DWG file is a single symbol or a whole drawing
- Font Transform file – allows you to remap fonts within the drawing.
Multi-Batch

The Multi batch tab allows you to run conversion processes at the same time as importing the drawing, these would be operations to align the source files to a standard import template.
Options

At the bottom of the window, you can also select the following options:
- Import Structure – when importing from a folder, this will copy the folder structure from the source
- Create Source Root Folder in Destination – create a Drawing Group for the root folder to place the drawings into.
- Version Drawing – Drawings will be assigned an initial version number during import. (This should be checked)
- Create Briefcase – a Briefcase will be created on the initial version of each drawing.