View, Edit & Create Data
View Data
We populate this view by defining the columns/properties we would like to display using the "Column Setup" view and applying filters to refine our results as the system will return all items that are in the documents set in the “Project Filter”
With our query (filters) and columns defined we can press the  button on the toolbar to populate the main data window.
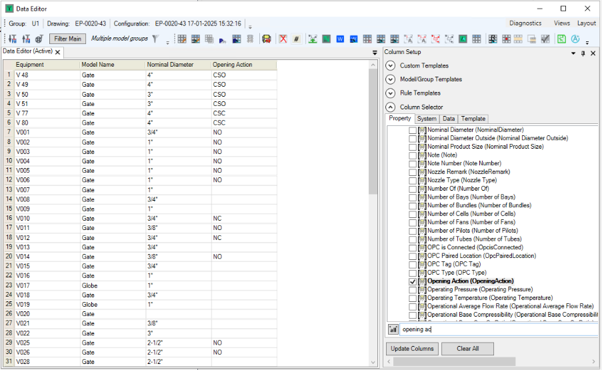
Checking one or more properties and clicking  will add those columns to the grid. Clicking
  unchecks every property.
Columns can be rearranged by clicking and dragging the column header, sorted by double clicking the heading and removed by right-clicking on the header and select “Remove Column”.
Column Setup
The Column Setup panel is used to change which columns are displayed in the main grid of Data Editor. Any of the Properties in Hazid Integrity can be selected to add to the grid. Which properties are available is determined for each user in Property Access Permissions in the Knowledge Bank.
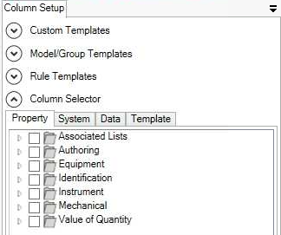
Under the Property tab you can see all of the properties which you have permissions for. You can use the search field to find a property.
The System tab contains a separate list of read-only properties that are defined by the software, including Drawing, Model Name and Rule Result Status.
When an item is selected in the main grid, the Data tab displays all of the populated properties for that item.
With a Custom Template selected, the properties within the template are displayed in the Template tab.
We can search the property tree with the function available at the bottom of the view.

The  buttons cycle between search results, and the
  buttons cycle between checked properties.
Column Templates
You may have pre-set templates available which will display all relevant properties for a particular purpose. There are three categories of templates:
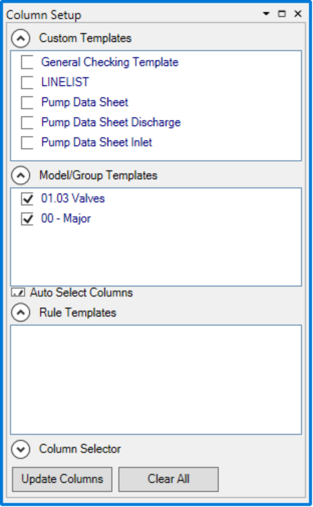
Custom Templates are predefined columns created in the Knowledge Bank and can be applied to all mapped or unmapped drawing items.
Model/Group Templates are similar to custom templates however they can only be applied to specific models, enabling the “Auto Select Columns” option will update the main window whenever you change model.
Rule Templates are similar to model/group templates however they are updated based upon the rule set in the “Rule Filter”
Configuration Attributes
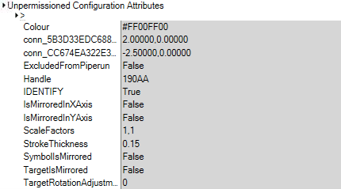
To view all the data including undefined properties for an item, we can use the Configuration Attributes view.
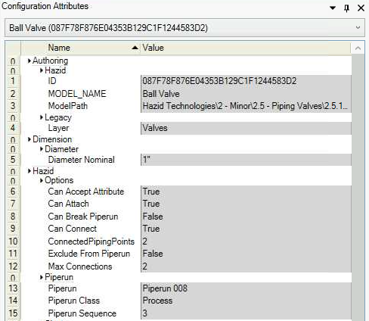
The unassigned data points will be shown at the bottom of the view as “Unpermissioned Configuration Attributes”.
Edit Data
To edit values requires us to enable the column in the main window. To enable the column, we can either search for it in the Property list or we can select the data tab which is already filtered to existing properties on the selected row.
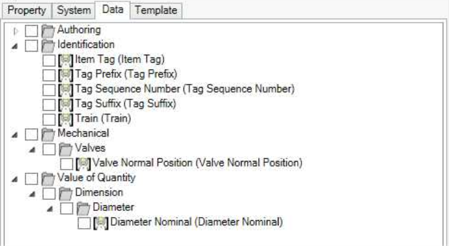
In this instance we will enable the “Valve Normal Position”, click Update Columns and change the value from “NC” to “NO” by clicking into the cell, typing the new value and pressing “Enter”. To cancel the edit, press the “Esc” key instead.


Alternatively, you may select the cell(s) and click “Edit Selected”  on the toolbar. This will bring up a window allowing you to type in the new value.

You can only edit properties which you have user permissions to edit. If the property is a unit or number property you will only be able to enter a numerical value. If the property has a value list, editing the cell will display a dropdown menu with the values list.
Create Equipment
Equipment items can be added directly in the Data Editor. To add an item to the current drawing, click the  button on the toolbar. This opens the equipment creation window:
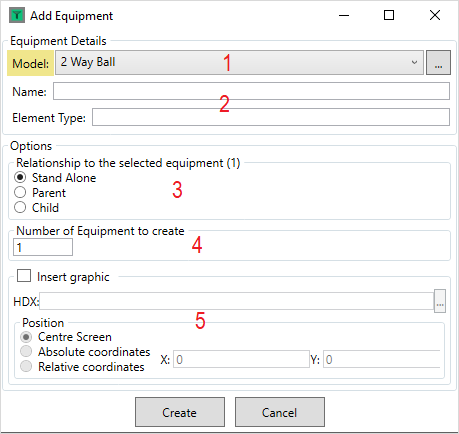
- Model - Select which model the equipment will have from the list, or click
 to open the model tree.
 - Name and Element Type - Enter the Equipment Name and Element Type properties
- Relationship - If an existing item is selected on the grid, the new equipment can be linked to it as a parent or child.
- Number - Entering a number will create multiple items of equipment
- Insert Graphic - This provides the option to add a symbol for the item to the current drawing. Select a .hdx of the symbol and specify the position in the drawing to place it.
Clicking  will add the item to the grid, clicking
  will close the form without saving.
Distinct Values
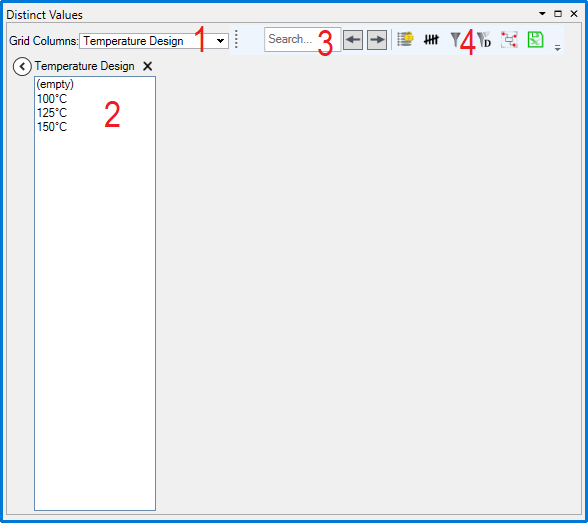
The Distinct Values panel can be used to list every unique value in a column currently displayed in the Data Editor grid.
The Distinct Values panel is accessed via the Distinct Values tab, which is enabled via the Views Menu.
-
Grid Columns - This menu will list every active column in the grid. Checking the boxes will display lists of all the distinct values in that column.
-
Distinct Values - The selected columns will be shown here with a list of every unique value. Clicking
 collapses the list and clicking
  removes it.
 -
Search Field - This can be used to search for values in the list. The
buttons cycle between search results. -
Toolbar
 Lock Values - This retains the distinct values list when the grid is filtered again
 Show Counts - This displays the number of instances of a value in the distinct values list:

 Set as Filter - When a value is selected from the list, clicking this will apply a property filter to the grid for the selected value.
 Clear Distinct Filters - This removes the property filter set on the distinct value.
 Highlight Linked Equipment - When a value is selected, clicking this will open Drawing Viewer with every item that has that value highlighted.
 Export to Excel - Clicking this will allow you to export the distinct values list to a .xlsx format. You will be asked to choose which columns to export:
