Property Editor
Hazid Integrity uses Properties from the P&ID as well as multiple other sources of engineering data if configured. To ensure that the rule will run on all input forms it stores all external properties against it's own Property alias list. This means that multiple installations of SmartPlant P&ID and other tools can use the same rules without having to edit the constraint properties for every installation or new input source.

Properties are stored in Groups which can be added at any level of the tree by selecting the location to add the group to, and clicking ![]()

Input the group name and select ![]() to save and close
To close without adding a group select
to save and close
To close without adding a group select ![]()
A Property can be created at any Group select ![]() to add a new Property, and enter it's
to add a new Property, and enter it's

Input the property name and select ![]() to save and close
To close without adding a property select
to save and close
To close without adding a property select ![]()
Upon Clicking ![]() , the alias will auto populate, and you can add the rest of the property data
, the alias will auto populate, and you can add the rest of the property data

- Name - The Property name as it will appear in Hazid Integrity
- Primary Alias - A unique key for the property. This will be filled automatically but can be modified
- Additional Aliases - Any additional aliases can be added with the
 button and removed with the
  button. Additional aliases are used to map attributes from different applications to be displayed under a single proeprty name in the Hazid suite
 - Value Type - Define if the property will be Numerical, string or United value
- Units - If selected Units a Unit Type and default Unit must be selected
In the "List Settings" area you can add a list of acceptable values:
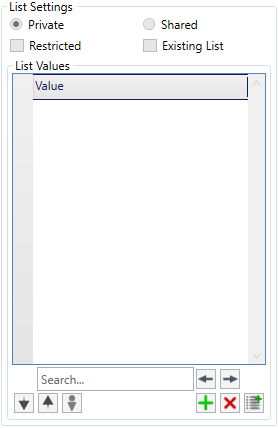
Use the ![]() button to add a list value. Use the
button to add a list value. Use the ![]() button to remove a value from the list.
The list options are:
button to remove a value from the list.
The list options are:
- Restricted - Selecting this option restricts the list so that only the listed values are acceptable when checking the property in a rule.
- Private - The list can only be used for one property.
- Shared - The list can be used by other properties.
- Use Existing List - Select this option to use the list stored for that particular property. De select to choose another list from the dropdown menu.
To remove a Property from the Tree select the desired property from the tree and click on the ![]() button.
button.
The ![]() button is used to import a list of values to be placed against a property from a .csv file.
button is used to import a list of values to be placed against a property from a .csv file.
The Save options are as follows
![]()
With "Autosave" checked, any changes you make will be automatically written to the databse, with it unchecked you must save your changes with the ![]() button, while the
button, while the ![]() button will exit the property editor.
button will exit the property editor.