Risk
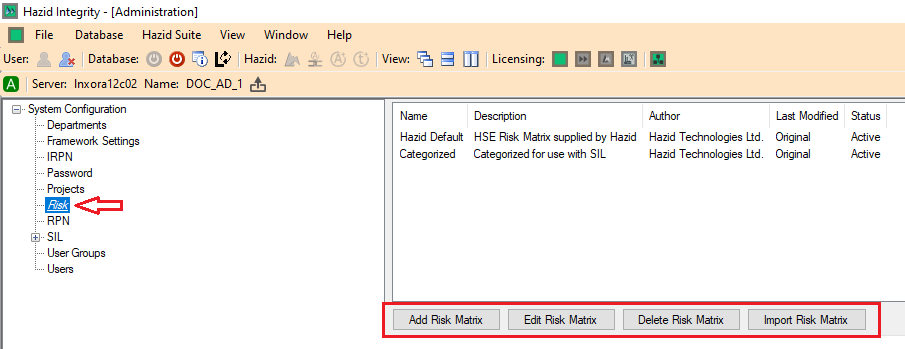
Risk Matrices are used to determine the Risk Ranking of Cause-Consequences within the HAZID Framework Process Safety Product and are created by clicking on the ![]() button, this opens the Risk Matrix Setup Menu. Selecting a Risk Matrix and clicking on the
button, this opens the Risk Matrix Setup Menu. Selecting a Risk Matrix and clicking on the ![]() button will open the Risk Matrix Menu for the selected Matrix. Note that a previously created Risk Matrix has been used for the purposes of this guide.
button will open the Risk Matrix Menu for the selected Matrix. Note that a previously created Risk Matrix has been used for the purposes of this guide.
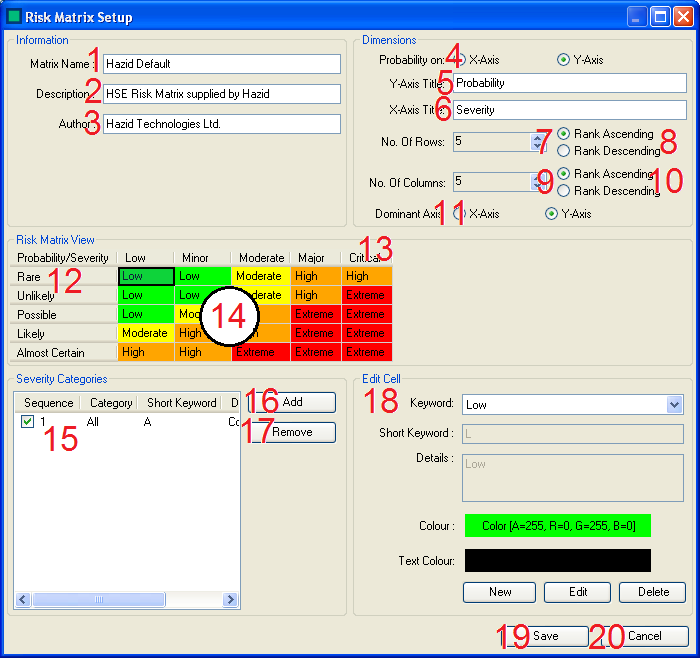
There are several actions that can be carried out to create/edit a Risk Matrix:
- The Administrator enters the Name of the Risk Matrix here.
- The Administrator enters the Description for the Risk Matrix here. (If required)
- The Administrator enters the Author for the Risk Matrix here. (If required)
- The Administrator sets whether the probability should be on the X-Axis or Y-Axis using these Radio Buttons.
- The Administrator enters the Title for the Y-Axis here
- The Administrator enters the Title for the X-Axis here
- The Administrator sets the Number of Rows in the Risk Matrix here.
- The Administrator sets whether the Y-Axis should be Ranked Ascending (From the Origin) or Descending (From the Origin) here.
- The Administrator sets the Number of Columns in the Risk Matrix here.
- The Administrator sets whether the X-Axis should be Ranked Ascending (Left to Right) or Descending (Right to Left) here.
- The Administrator sets whether the Dominant Axis should be the X-Axis or Y-Axis using these Radio Buttons.
- The Row Headings, clicking one of these allows the Administrator to Edit the Row Heading Data in the Edit Cell Panel (18)
- The Column Headings, clicking one of these allows the Administrator to Edit the Column Heading Data in the Edit Cell Panel (18)
- The Risk Rankings, clicking one of these allows the Administrator to Edit the Risk Ranking Data in the Edit Cell Panel (18)
- The Severity Category List, this displays all the Severity Categories available in the Risk Matrix, these can be associated/disassociated with the selected Cell using the Checkbox.
- The "Add" button for Severity Categories, clicking this allows the Administrator to Add Severity Categories in the Add Risk Category Menu
- The "Remove" button for Severity Categories, clicking this allows the Administrator to Remove Severity Categories.
- The Risk Matrix Cell Editor, this panel allows the Administrator to Edit the Data Present in items 12, 13 and 14, there are 3 different data types
- Probability Data - This is the detailed data about the probabilities and is item 12 or 13, dependent on graph orientation (4)
- Severity Data - This is the detailed data about the severities and is item 12 or 13, dependent on graph orientation (4)
- Risk Ranking Data - This is the detailed data about the Risk Rankings and is item 14.
- The Administrator can Save the Risk Matrix Using the Save button.
- The Administrator can Cancel saving the Risk Matrix/Abandon any changes made to an existing Risk Matrix Using the Cancel button.
The ![]() button is used to quickly delete a Risk Matrix. However, deleted Risk Matrices are not removed from the database, and can be restored by selecting them and clicking on the
button is used to quickly delete a Risk Matrix. However, deleted Risk Matrices are not removed from the database, and can be restored by selecting them and clicking on the ![]() button.
button.
The ![]() button allows the Administrator to import a Risk Matrix from an existing Hazop study.
button allows the Administrator to import a Risk Matrix from an existing Hazop study.