Framework Settings
The Framework settings options are accessed from two locations in the Admin tree, Framework Settings and Password Structure Management

Password Structure Management
The Password Structure Management page allows the administrator to define the Password Structure requirements in order to define the minimum password security requirements for the system when Windows Authentication is not being used.
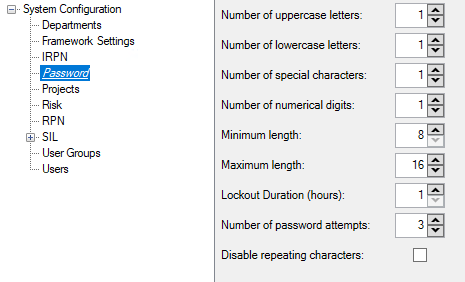
Here the administrator uses the ![]() buttons to define the minium quantities of uppcase letters, lowercase letters, special characters and numerals. They are also used to define the mix/max overall length of the password, as well as the number of failed attempts before lockout occurs, as well as the duration of that lockout. The "Disable repeating characters" checkbox, when checked, disallows passwords where two or more characters repeat themselves sequentially.
buttons to define the minium quantities of uppcase letters, lowercase letters, special characters and numerals. They are also used to define the mix/max overall length of the password, as well as the number of failed attempts before lockout occurs, as well as the duration of that lockout. The "Disable repeating characters" checkbox, when checked, disallows passwords where two or more characters repeat themselves sequentially.
Settings
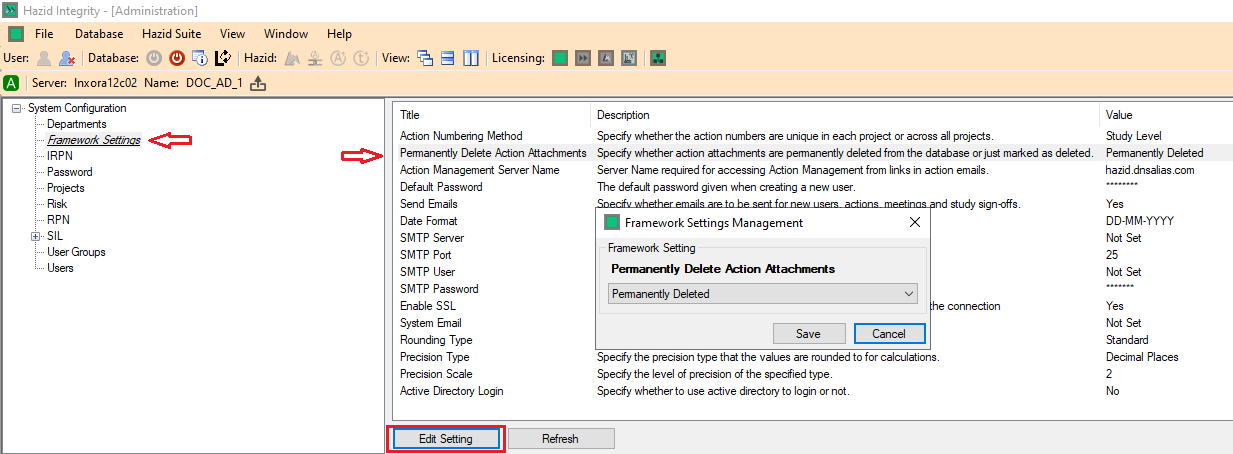
The interface for Amending the General Framework Settings is presented to the Administrator as a list of variables, each setting can be changed by selecting the setting the Administrator wishes to change and clicking on the ![]() Button. The options open to the Administrator upon clicking on the
Button. The options open to the Administrator upon clicking on the ![]() Button for each setting are outlined Below:
Button for each setting are outlined Below:
Action Numbering Method
The Action Numbering Method allows the Administrator to select how their Organisation wishes the Actions Generated to be Numbered.
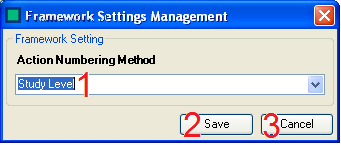
There are Three sections to the action numbering:
- The Numbering method selection - there are three numbering methods
- Study Level - Each new study has it's own set of Action Numbers beginning at 1
- Project Level - Each project has it's own set of Action Numbers beginning at 1
- Global - Actions are numbered globally, beginning at 1
- The Administrator can save any changes by clicking on the 'Save' button
- The Administrator can discard any changes by clicking on the 'Cancel' button
Permanently Delete Action Attachments
The Action Attachments menu allows the Administrator to select what happens to any attachments on an Action when they are set to be deleted.
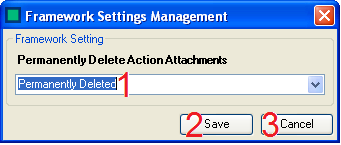
There are Three sections to the Permanently Delete Action Attachments Settings:
- The Delete method selection - there are two delete methods
- Permanently Deleted - When this is selected, Action Attachments are permanently deleted from the server
- Mark As Deleted - When this is selected, Action Attachments are not permanently deleted from the server, but marked as deleted (so not visible to users)
- The Administrator can save any changes by clicking on the 'Save' button
- The Administrator can discard any changes by clicking on the 'Cancel' button
Action Management Server Name
The Action Management Server Name menu allows the administrator to amend the location that the Framework looks to for it's action management server.

There are Three sections to the Action Management Server Name Settings:
- The Action Management Server Name - The address of the Action Management Server is Entered here.
- The Administrator can save any changes by clicking on the 'Save' button
- The Administrator can discard any changes by clicking on the 'Cancel' button
Default Password
The Default Password menu allows the Administrator to amend the default password entered by users when they first login to Framework, which they are prompted to change.

There are Three sections to the Default Password Settings:
- The Default Password - Here the Administrator can change the Default Password if required. The default Default Password is 'password' - this should be changed to a structure that matches your corporate password requirements as soon as possible.
- The Administrator can save any changes by clicking on the 'Save' button
- The Administrator can discard any changes by clicking on the 'Cancel' button
Send Emails
The Send Emails menu allows the Administrator to set whether or not the Framework sends out the Action Emails, the default setting is 'Yes'

There are Three sections to the Send Emails Settings:
- Send Emails - Here the Administrator can change whether or not to send emails, selecting 'Yes' will send emails, selecting 'No' will not.
- The Administrator can save any changes by clicking on the 'Save' button
- The Administrator can discard any changes by clicking on the 'Cancel' button
Date Format
The Date Format menu allows the Administrator to select the format that they wish to view the date in.

There are Three sections to the Send Emails Settings:
- Date Format - Here the Administrator can change the format that they wish to view the date in, there are two date formats
- DD-MM-YYYY - The default date format
- MM-DD-YYYY - The US date format
- The Administrator can save any changes by clicking on the 'Save' button
- The Administrator can discard any changes by clicking on the 'Cancel' button
If you have a requirement for a different date format, please contact Hazid Technologies Ltd on Support@Hazid.com, alterantively please visit our website https://www.hazid.com/
SMTP Server
The SMTP Name menu allows the administrator to amend the location that the Framework looks to for it's SMTP server, to send Action emails.

There are Three sections to the SMTP Server Settings:
- The SMTP Name - The address of the SMTP Server is entered here.
- The Administrator can save any changes by clicking on the 'Save' button
- The Administrator can discard any changes by clicking on the 'Cancel' button
SMTP Port
The SMTP Port menu allows the administrator to amend the port that the Framework looks to for it's SMTP server, to send Action emails.

There are Three sections to the SMTP Port Settings:
- The SMTP Port - The address of the SMTP Port is Entered here.
- The Administrator can save any changes by clicking on the 'Save' button
- The Administrator can discard any changes by clicking on the 'Cancel' button
SMTP User
The SMTP User menu allows the administrator to amend the user that the Framework looks to for it's SMTP server, to send Action emails.

There are Three sections to the SMTP User Settings:
- The SMTP User - The Name of the SMTP User is Entered here.
- The Administrator can save any changes by clicking on the 'Save' button
- The Administrator can discard any changes by clicking on the 'Cancel' button
SMTP Password
The SMTP Password menu allows the administrator to amend the password used to access the SMTP server, to send Action emails.

There are Three sections to the SMTP Password Settings:
- The SMTP Password - The SMTP Password is Entered here.
- The Administrator can save any changes by clicking on the 'Save' button
- The Administrator can discard any changes by clicking on the 'Cancel' button
Enable SSL
The Enable SSL menu allows the adminstrator to specify whether the SMTP Client uses Secure Sockets Layer to encrypt the connection

There are Three sections to the SSL Password Settings
- The SSL Selection - The SSL is defined as on or off here
- The Administrator can save any changes by clicking on the 'Save' button
- The Administrator can discard any changes by clicking on the 'Cancel' button
System Email
The System Email menu allows the administrator to set the Email account from which all of the Action Management Emails are sent from.

There are Three sections to the System Email Settings:
- The System Email - The Administrator Enters the Email address from which all action emails will originate from.
- The Administrator can save any changes by clicking on the 'Save' button
- The Administrator can discard any changes by clicking on the 'Cancel' button
Rounding Type
The Rounding Type menu allows the administrator to set how they wish for any decimals to be rounded within the Framework

There are Three sections to the Rounding Type Settings:
- The Rounding Type - The Administrator selects the rounding type from the list, there are Four different Rounding Types
- Standard - This Rounding Type will round off using the standard rounding (up where the decimal is greater than or equal to .n5 and down where the decimal is less than .n5 (where n is the level of precision defined in the Precision Scale))
- Always Round Up - This Rounding Type will always round the value up to the next increment of the level of precision defined in the Precision Scale
- Always Round Down - This Rounding Type will always round the value down to the previous increment of the level of precision defined in the Precision Scale
- None - This will display the number to the level of precision defined in the Precision Scale with no Rounding
- The Administrator can save any changes by clicking on the 'Save' button
- The Administrator can discard any changes by clicking on the 'Cancel' button
Precision Type
The Precision Type menu allows the administrator to set how they wish any decimals to be displayed within the Framework

There are Three sections to the Precision Type Settings:
- The Rounding Type - The Administrator selects the rounding type from the list, there are Two different Rounding Types
- Decimal Places - This Precision Type will use a specific (defined in the Precision Scale Menu) number of Decimal Places in rounding
- Significant Figures - This Precision Type will use a specific (defined in the Precision Scale Menu) number of Significant Figures in rounding
- The Administrator can save any changes by clicking on the 'Save' button
- The Administrator can discard any changes by clicking on the 'Cancel' button
Precision Scale
The Precision Scale menu allows the administrator to set the scale to which the Precision Type is displayed within the Framework

There are Three sections to the Precision Scale Settings:
- The Precision Scale - The Administrator set the Precision Scale, which must be an integer. This corresponds to the number of decimal places/significant figures values are displayed to within the Framework
- The Administrator can save any changes by clicking on the 'Save' button
- The Administrator can discard any changes by clicking on the 'Cancel' button
Active Directory Login
The Active Directory Login menu allows the administrator to specify whether to use active directory login or not - this enables users to login into the system using their windows authentication

There are Three sections to the Active Directory Login Selection Settings:
- The Active Directory Login Selection - The Active Directory Login is defined as on or off here
- The Administrator can save any changes by clicking on the 'Save' button
- The Administrator can discard any changes by clicking on the 'Cancel' button