Rule Trigger
Once you have set the action that you wish the rule to carry out, the final stage of creating a model configuration rule is to create a trigger. Rule Triggers are Safety Analysis Checklist rules that trigger the Model Configuration Action to be carried out when the conditions defined in them are met, to create a rule trigger, click on the ![]() button under the Trigger (or Rule Trigger from the Update Property section of the Model Configuration Action window) Panel.
button under the Trigger (or Rule Trigger from the Update Property section of the Model Configuration Action window) Panel.
This opens the Rule Trigger Creator
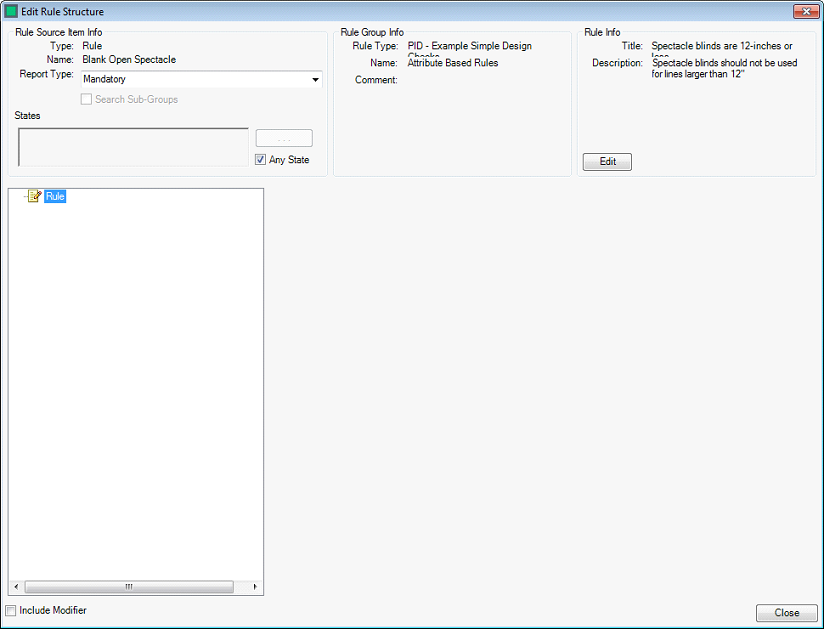
Rule Trigger Item
Create a new rule item by right clicking on the ‘Rule’ header and selecting ‘Create Rule Item’
![]()
The Rule Trigger Detail form is where you create the individual rule items that will enable you to run the Rule Configuration.
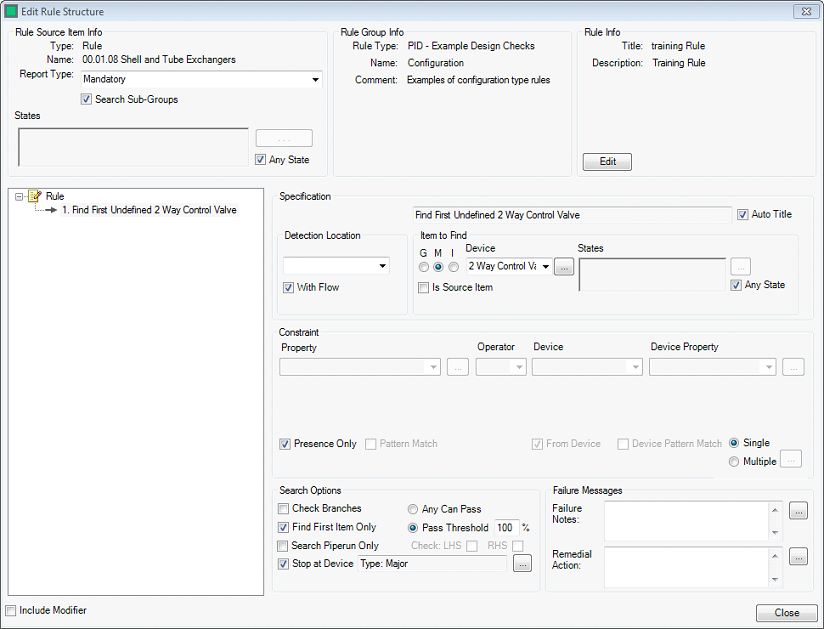
The form is split into multple sections each detailing different aspects of the rule.
The Rule Source Item Info displays the information about how and where the rule will run.
- Type - The Type of Rule created Model Configuration
- Name - The Name of the source Item. This is the item that will be detected within the P&ID and trigger the rule to run
- Search Sub Groups - Whether the rule will only run on items directly bellow the Model Group of all sub items
- State - The state the source item must be in to trigger the rule. For more Information see Setting States.
The Rule Group Info displays the Name and Comment entered in the Action Creation.
- Name - A name for the rule
- Comment - A description of the action and triggers
The Rule Info displays the Action that will be applied in the event of the ule passing
- Action Type - The Action Type specifies what the rule will do in the event that it passes. Currently there are three action types.
- Set Port - Sets the Model Port of the Trigger Item
- Set State - Sets a state in the trigger Item
- Clear State - Clears a state of the trigger item
- Action - The Action allows you to specify the state, Port or Port Type to set within the trigger item
Create Rule Item
The main section of the Rule Details is where you will actually create each individual rule item.
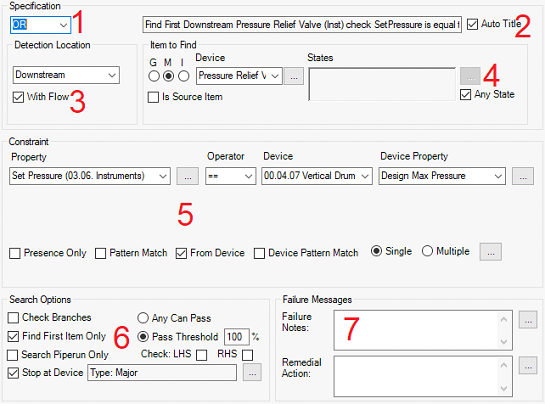
Rule Specification - The Overall Rule Specification, there are three Boolean options here, “AND, OR and NOT” which allow you to specify the Boolean logic of your rule (note that the first item in a rule should be “OR” or “NOT”)
Rule Item Title - Here you can enter a title for the rule item that you are creating, by unchecking the ‘Auto Title’ checkbox
Detection Location – This is the way in which the Integrity Framework System should search for the required equipment, there are 13 different search mechanisms:
Search Type Description Attached Causes the rule to search for a directly attached device ControlLoop Causes the rule to search for the device in a control loop that affects the equipment on which the rule is created Document Causes the rule to search the entire document (P&ID/SLD etc.) for an item that matches the search parameters Downstream Causes the rule to search only downstream of the equipment on which the rule is created, as far as the next major equipment item. Instrumentation Causes the rule to search for the device on signal lines connected to the equipment on which the rule is created Port Causes the rule to search for the device down the line attached to a particular port on the equipment on which the rule is created. The port is selected by the user from a second drop down menu that becomes active when ‘Port’ is selected as the search type. PortType Causes the rule to search for the device on a particular type of port, Signal, Ignore or Mappable, the port type to search is define by the user from a second drop down menu that becomes active when ‘PortType’ is selected as the search type. Process Causes the rule to search all connections, both upstream and downstream as far as the next major item of equipment. Project Causes the rule to search the entire project for an item that matches the search parameters Self Causes the rule to act upon the item of equipment on which the rule is created. Signal Causes the rule to search all of the signal lines connected to the equipment on which the rule is created. Upstream Causes the rule to search only upstream of the equipment on which the rule is created, as far as the next major equipment item. InPath This search is used in compound rules, to search the line between two items of equipment defined in consecutive rule items. With Flow - Enables the search to proceed only where the direction of flow matches the direction specified in the original detection location.
Search Item Definition - This is the Search Item definition section, here the user defines the item the Integrity is to search for. It can be broken down into 4 parts.
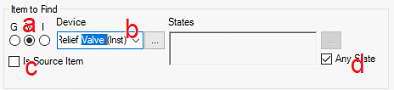
Set the type of equipment you wish to search for, using the GMI (Group, Model, and Instrument) radio buttons.
Set the device that you wish to search for, the device search box varies depending upon the equipment type being searched for.
The ‘Is Source Item’ check box, checking this sets the IF to use the Item on which the rule is crated as its item to find.
The State Selection section, here you select the operational states of the equipment that you wish to search for, leaving the states unselected will search for items only in their default states and clicking the
 button opens the state selector
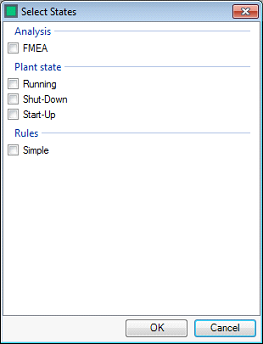
Checking the ‘Any State’ check box will search for the item of equipment no matter what state it is in and
Constraint Definition - Here you specify the conditions pertaining to the source item and the item for which you are searching to compare, this can be split into the following sections
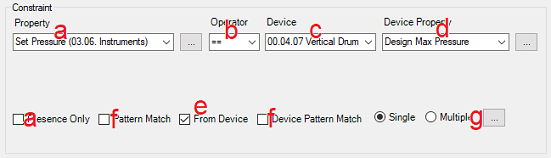
The Property box, here you select the property of the item that you are searching for, that you wish to compare. Clicking the
button opens the advanced property search window. Note that checking the ‘Presence Only’ checkbox will grey out he constraint section and set Integrity to search for the item only. Also of note is that if a Property has other properties associated with it, then these are selectable in a box below the first.The operator that you wish to use in you comparison
The device selection drop down, here you select the device that you wish to carry out the comparison with. Note that un-checking the ‘From Device’ check box allow you to enter a unit value for the comparison.
The device property, here you select the property of the device that you wish to compare.
Unchecking the ‘From Device’ checkbox enables you to set the value to check the property against yourself, using either a unit value (pressure, temperature, flow, etc.), a text value (alpha-numeric), a number (numeric only) or a regex function (matching a string)

The ‘Pattern Match’ checkbox allows you to use a regex expression to select a section of the property that you wish to check and check that against another property, for example checking that the first part of a pipe tag matches the nominal diameter of the pipe.
The Multiple Constraint option, this allows you to have multiple constraints that need to be met in order for an individual rule item to pass, to add multiple constraints, check the ‘Multiple’ radio button and then click on the
to open the Multi-Trigger Editor.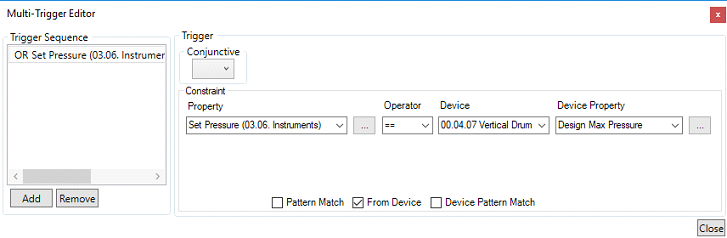
Here you configure triggers in the same way as above, except you use the Booleans and the buttons to create multi-constraint systems
Search Options - there are 6 search options that can be selected
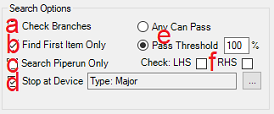
- Check Branches – This sets the Integrity checker to search along all branches of pipes that it finds in its search.
- Find First Item Only – This sets the Integrity checker to stop its search upon finding the first item that matches the search criteria
- Search Pipe run Only – This sets the Integrity checker to only search in the pipe run that is immediately connected to the search location
- Stop at First Device – This sets the Integrity checker to not search past the first device of the type that you specify using the button.
- The pass/fail selection – This search option only comes into force when the rule item is searching for a property in the “Constraint” section. “Any Can Pass” allows the rule item to pass if any individual “item to find” passes. Setting the “Pass Threshold” allows the rule item to pass if equal to or greater than a certain percentage of the “items to find” passes.
- The left hand side/right hand side check boxes, here you set whether to check that data is present in the parent of the item that you are looking for, for instanceindividual pieces of pipe have all of their data stored in their parent ‘pipe run’ item type.
Failure Message - here you enter any message that you would like to convey to the person viewing the rule results, such as the most likely cause of the rule failure, and the most common remedial action to take in order to rectify the rule failure.
When a rule is closed Hazid Integrity will verify that the rule items are correct and all informatin is completed.
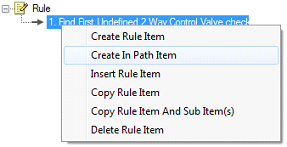
In Path Rule Item
Upon completing a rule entry, you can add additional sections to the rule item that you have created by right clicking on the rule item and selecting either ‘Create Rule Item’, which creates a rule item in the same way as outlined above, or by selecting ‘Create In Path Item’, which allows you to search between two items of equipment.
These rules operate in the same way as outlined previously, except with an additional set of radio buttons in the ‘Constraints’ section of the rule item creator
![]()
These allow you to specify the pass criteria for the item that you are searching for, there are 3 pass criteria:
- Mandatory - The item that you are searching for must be present between the two items for the rule to pass
- Optional - The item that you are searching for can be present, but must match the pass the comparison defined in the constraints section for the rule to pass
- Prohibited - The item that you are searching for must not be present for the rule to pass.
Rule Modifiers
The final part of creating a rule is adding a rule modifier if required. Rule modifiers are used to force the rule to run only when certain criteria have been met, for instance a rule modifier can be used to ensure that a rule to check that piping is insulated is only run when the temperature of the fluid within the piping is above 60C. Since a model configuration rule trigger is effectively a modifier itself, modifiers on triggers are largely redundant. To add a rule modifier check the ‘Include Modifier’ check box in the bottom left corner of the rule structure editor, this enables the modifier tab.
Rule modifiers are created in the same way as the rule itself, and like the rules can be multi-layer to produce very strict conditions under which the rule will be run, note that Failure Notes and Remedial Actions for Modifiers cannot be viewed through the results for failed Modifiers, as if the Modifier fails, then the rule itself is not run, if they are filled in, then they will only be visible in the Editor, and in the ‘View Rule’ section of the rule results, and then only for rules that have passed.